Today I will take a look at my latest investment, Lightbee switches for LK fuga frames which is used in most houses in Denmark.
Several months ago I installed Ikea ZigBee bulbs all over my house, but until recently I have controlled them the old school way by cutting power to them using a normal light switch.
This was only a temporary solution, and now, I have finally installed smart switches in the original frames, using LK IHC rockers giving it a nice finish.
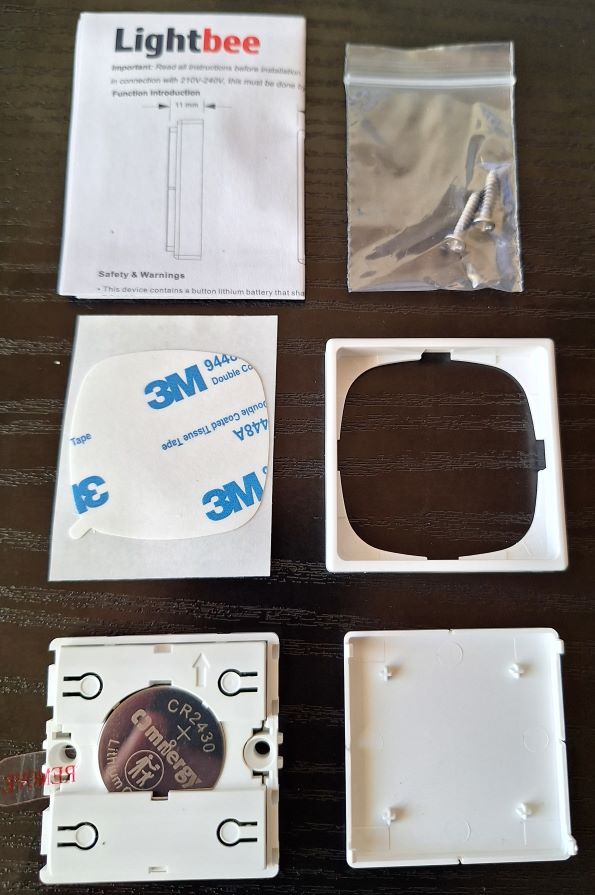
This was in the box. The manual is mostly for connecting to the Phillips hue app.
I don’t need to screws and the sticker, so I will concentrate on the switch itself.
The switch comes with it’s own frame, and the rocker is one big plate with 4 (+2) options.

Here I took the switch out of the frame, and removed the rocker.
The 2 extra click options that are not obvious, is pressing the 2 top at the same time, and pressing the 2 bottom at the same time.
When I install the LK IHC rockers, I won’t be able to use those.
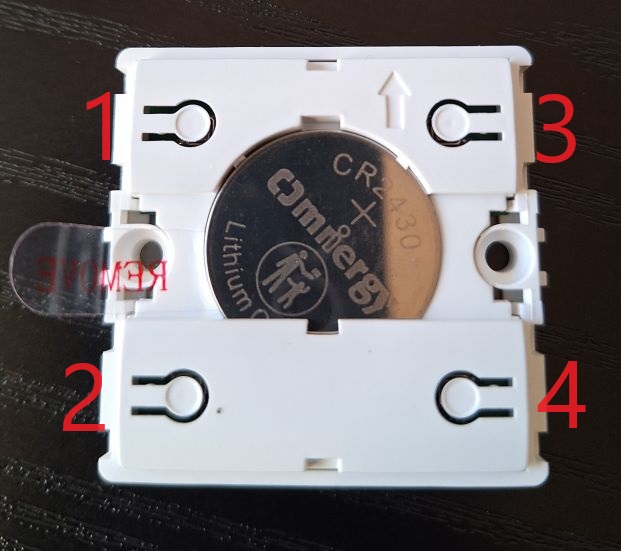
Here is a close-up of the switch without rockers.
I have written numbers on, since we will be using them in a moment.
The battery is easy to switch since it’s on the front.
I tried using the switch with the standard rocker, and it works OK, the feedback and feel is good, but the sound is a little loud and it does sound like a cheap plastic click.
One of the great thing about these switches is that you can buy LK rockers and click-on out-of-box, no modification needed, so I picked up a bag of mixed LK IHC rockers, so I can change them according to the need in every room.
If you want these in Home Assistant, you need a ZigBee controller running on channel 11, 15, 20, or 25.
It won’t work on ZHA, but it will work on Zigbee2MQTT and DeConz.
The electronic in these are EnOcean PTM 215Z, and you can find a lot of information on these online, if needed.
To pair it, put you controller in pair mode, and:
– If your controller is running on channel 11 press button 3 for 10 seconds, when you release, it pairs.
– If your controller is running on channel 15 press button 1 for 10 seconds, when you release, it pairs.
– If your controller is running on channel 20 press button 2 for 10 seconds, when you release, it pairs.
– If your controller is running on channel 25 press button 4 for 10 seconds, when you release, it pairs.
After pairing, you can rename the switch and go to Home Assistant and make an automation to control light in a room according to your needs.
A simple configuration could be like the one I use in my bedroom, so I will post it here.
Press 1: Turn light on in Bedroom.
Press 3: Turn light off in Bedroom.
Press 2: Turn brightness down by 15%.
Press 4: Turn brightness up by 15%.
Press 4 will turn the light on, if they are off when you pressed.
Press 2 will turn off the light when you press it and the brightness is below 15%.
The installation into the frame was easy and simple, since everything fitted perfectly together. The wiring was of course changed, so the bulb have constant power now.
The only thing I hadn’t taken into account was the screws. LK uses it own system, and it doesn’t work with the Lightbee switches, so I had to buy long screws that attaches to the end of the wall box. but they are available everywhere.
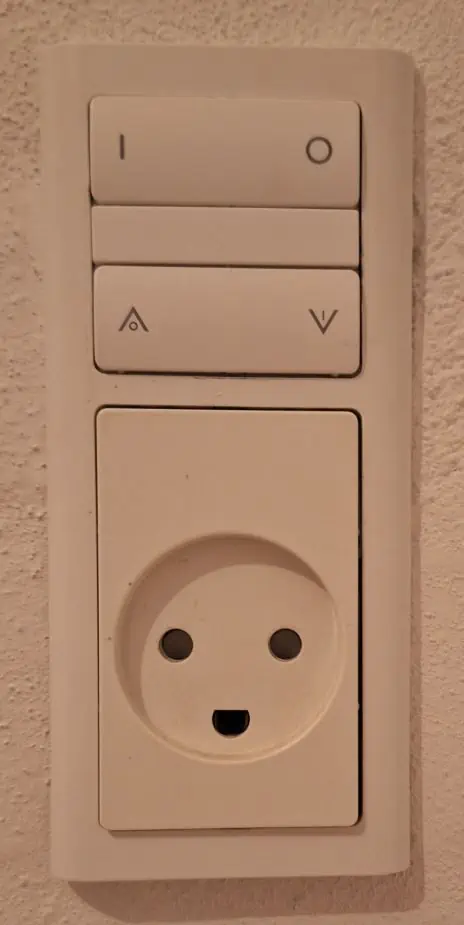
Here is a picture of the switch after it was installed in the frame:
alias: Bedroom Light Control Fuga
description: ""
trigger:
  - platform: device
    domain: mqtt
    device_id: a7e9e87f9849ade2c230ead1ee7697e7
    type: action
    subtype: press_1
    discovery_id: 0x0000000001716704 action_press_1
    id: "1"
  - platform: device
    domain: mqtt
    device_id: a7e9e87f9849ade2c230ead1ee7697e7
    type: action
    subtype: press_3
    discovery_id: 0x0000000001716704 action_press_3
    id: "3"
  - platform: device
    domain: mqtt
    device_id: a7e9e87f9849ade2c230ead1ee7697e7
    type: action
    subtype: press_2
    discovery_id: 0x0000000001716704 action_press_2
    id: "2"
  - platform: device
    domain: mqtt
    device_id: a7e9e87f9849ade2c230ead1ee7697e7
    type: action
    subtype: press_4
    discovery_id: 0x0000000001716704 action_press_4
    id: "4"
condition: []
action:
  - choose:
      - conditions:
          - condition: trigger
            id:
              - "1"
        sequence:
          - service: light.turn_on
            metadata: {}
            data: {}
            target:
              area_id: bedroom
      - conditions:
          - condition: trigger
            id:
              - "3"
        sequence:
          - service: light.turn_off
            metadata: {}
            data: {}
            target:
              area_id: bedroom
      - conditions:
          - condition: trigger
            id:
              - "2"
        sequence:
          - service: light.turn_on
            metadata: {}
            data:
              brightness_step_pct: 15
            target:
              area_id: bedroom
      - conditions:
          - condition: trigger
            id:
              - "4"
        sequence:
          - service: light.turn_on
            metadata: {}
            data:
              brightness_step_pct: -15
            target:
              area_id: bedroom
mode: single
Conclusion:
If you own a house in Denmark, it likely have LK Fuga frames in the entire house. Buying LK equipment like IHC is a very expensive way to go, and when you already have an open system like Home Assistant, it doesn’t make sense to take that road. That leaves you with a choose of the new LK Wiser or third party equipment like the Lightbee switches I have bought, and installed.
I have never tried LK Wiser, so I won’t comment on that, but this Lightbee solution is a very good alternative to going LK. It does it’s job just like promised, and it’s even compatible with LK rockers, and frames, so it will fit perfect in the frame you already have on the wall. It will even make it possible to extend the frame a module up, because the switch is flat on the back, you can buy a larger frame and install the Lightbee switch above the box in the wall.
I am happy for my new Lightbee switches, and I can easily recommend them to anybody else searching for an LK alternative.
This was made and tested on Home Assistant version 2024.1.5.