After 6 weeks use, it’s time for a review of the Meater 2 Plus (now renamed to Meater Pro). A Meater that have improved in almost every way.
I haven’t owned a Meater 1, but I have used other brands with similar promise. On paper the Meater 2 Plus looks like the perfect wireless smart meat thermometer, but let’s see if it is.
If you like, you can check out my post about the Meater 2 Plus integration in Home Assistant.
The Meater 2 Plus is a little thinner than others, making it easier to insert, and making a smaller impact on the meat. There is no need to insert it all the way in, but just below the mark halfway down the stick.
This makes it a lot more flexible to install into the meat, and makes it much more user friendly.
1 thing to notice is that you can’t have the Meater 2 Plus under liquid for longer periods of cooking. So while you can safely put it in the dishwasher when you are done cooking, you can’t stick it in the side of meat and then drown it in liquid, it will stop responding after 10 minutes.
Another great new feature is the ambient temperature up to 550 degrees Celsius. This means you can leave the Meater 2 Plus in the meat while you reverse sear it, or while you grill it.
It’s not grill season, so i will make a pork chop in my air fryer, and then reverse sear it on the frying pan.
The Meater app is great, it’s easy to start a cook, and there are some nice dashboards to show temperatures and times. But this is a Home Assistant blog, so I will start the cook on the app, and then monitor everything in Home Assistant.
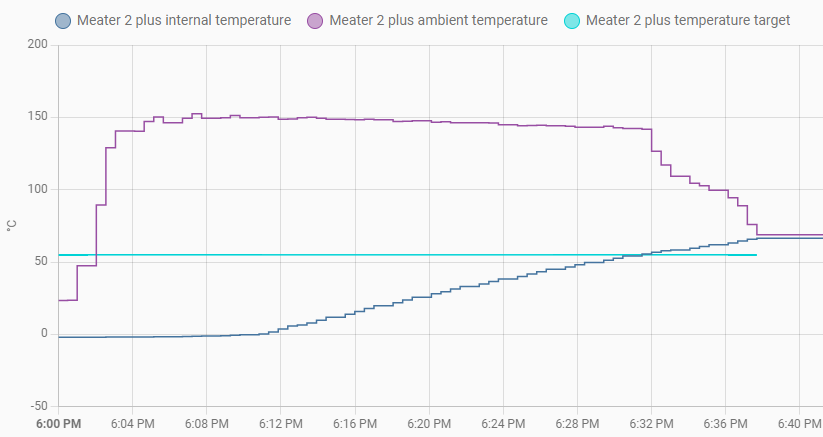
In this example I will set the target in the air fryer to 55 degrees Celsius, and then fry it till it reaches 65 degrees.
As you can see from the graph, the meat was still a little bit frozen inside when I started.
You can also see that I pre heated the frying pan, so there where no drop in temperature when I moved the meat from the air fryer to the frying pan.
Temperature target on this picture is 55 degrees.
Conclusion:
The Meater 2 Plus is a little pricy compared to similar products, but in my opinion, it’s also better. It does everything you want it to, and without the problems some of its competitors have. Everything is easy and just works as expected. The app have great dashboards, for example the one showing temperatures of the 5 internal sensors and the ambient sensor. I hope someone will make cool dashboards like that for Home Assistant, but I haven’t found anything that advanced yet.
The range is good, while I was cooking the example meal, me and my phone was in the office, and there were no problems with connection dropouts. If you want unlimited range, use another phone for the Bluetooth connection, read more about connectivity and Home Assistant integration here.
The 5 internal sensors makes it easier to place the probe in the meat, and it gives you confidence that at least 1 of the the 5 sensors is placed in the center.
It’s easy to clean the Meater 2 Plus, but if you are too lazy to do it yourself, just put it in the dishwasher.
Happy cooking!
You can buy the Meater Pro using this Affiliate link, and you can read my review of the MeatStick V here.