I have had 2 of these with ZigBee for 9 months now, so it’s time for a review of a cheap CO2 sensor with display.
As you might have read in my reviews of the Airthings View Plus or Nedis Air Quality Monitor, I have been looking for cheap CO2 sensors. The Airthings View Plus is brilliant, but too expensive to place in each room. Cheap CO2 sensors with a prober NDIR sensor are hard to find, so when I discovered the Heiman Air Quality Monitor, I bought 2 of them.
The Heiman Air Quality Monitor does have a temperature and humidity sensor, but these are secondary in my opinion, so my primary focus will be on the CO2 sensor in this review.
The first thing to be aware of, is there are 3 versions of this device:
– WS3AQ – This version have wifi.
– HS3AQ – This version is standalone, so no ZigBee and no wifi.
– HS3AQ-TY, HS3AQ-EFR, HS3AQ.EFA – These versions have ZigBee.
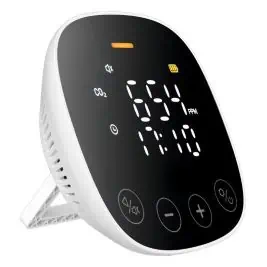
Both my devices are HS3AQ-EFA, so this review will be of that particular model.
If you look in the specifications, you will see that CO2 Sensor Lifespan is maximum 10 years, and while that might sound odd, it’s actually quite good, many CO2 NDIR sensors have a lifespan of 2-3 years.
The included instructions are good and explains most settings, features, and parameters.
A cheap device like this of course comes with compromises, one of them is the ABC calibration, where ABC stands for Automatic Baseline Calibration. It works by measuring CO2 levels for 7 days, and using the lowest reading in that period as a 400 ppm baseline, so you will need to expose the device to fresh air at least one time a week. For me it’s not a problem, i ventilate the house multiple times a day, and that’s good enough for the readings to be precise, but the device is not suitable for placement in areas where the CO2 level is always high.
Another compromise is the battery, it’s only a backup battery for a 6 hour runtime. So you need a micro-usb cable connected to the device all the time. It’s a design choice, and the good thing about it is a quick update interval of 5 minutes, and a clear display with rapid updates and multiple options.
It will give both an audible and visual notification when CO2 level goes beyond 2000 ppm (can be adjusted), but you can configure this, and set a “Do not disturb” interval, so it’s not waking you up in the middle of the night for example.
I use 1 of these in my bedroom, and I haven’t found a way to disable the display entirely. So to avoid the display light up the bedroom at CO2 changes, I have mounted mine behind the TV with the display facing the wall. This might not be an optimal solution for everyone, but it works fine for me.
The design with the mirror screen will properly divide people. It’s defiantly a different solution than most other devices, where focus is more on energy consumption. I use the 2. of my devices in my office, and it’s nice and easy to see CO2 levels on the display without having to access Home Assistant.
I placed the device next to my Airthings View Plus for a few days to show how they measure
We start with CO2:
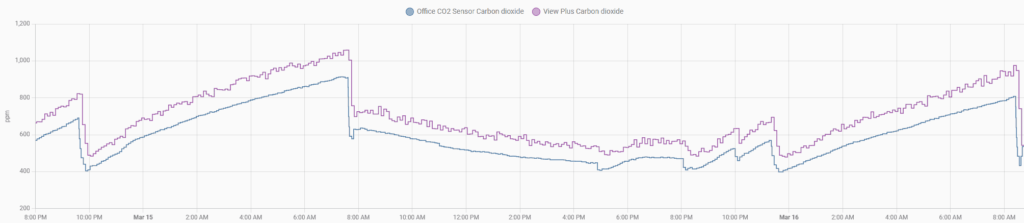
2 things strike me when I compare them.
1. The Heiman Air Quality Monitor readings are 10-20 percent lower than the Airthings View Plus.
2. The Heiman Air Quality Monitor react faster to changes than the Airthings View Plus.
Neither of these devices are professional calibrated, so I can’t tell which one of them is closest to the truth. Both gives a very good indication of the CO2 level, and that’s enough for me. I don’t need to know if the CO2 level is 900 or 1050 ppm, I just need to know that it’s time to open a window or door and get some fresh air in.
If I look at the humidity readings, they are within a few percent. The Heiman Air Quality Monitor is a little more volatile, and the Airthings View Plus is more stable, but they agree on the humidity level.
Last is the temperature readings. I have had these devices for 9 months now, and I noticed right away that the temperature of the Heiman Air Quality Monitor was a little off, so I went to Z2M and changed the “Temperature calibration” to -1.
When I compare the 2 devices with this offset on, they are always within 0,3 degrees Celsius, and most of the time they are within 0,1 degrees. Again the The Heiman Air Quality Monitor react faster to changes than the Airthings View Plus, so it looks a little more volatile.
Conclusion:
Taking the price into account, the Heiman Air Quality Monitor is a very good air quality sensor. It’s got 3 sensors, and with a little offset on the temperature, the humidly and temperature readings are spot on.
The CO2 readings are 10-20 percent below the Airthings View Plus, but without professional calibrated equipment it’s impossible to know what the truth is. If you believe the Airthings View Plus are spot on, you can go to Z2M and adjust the Co2 calibration, and you could have these devices within 5 percent all the time. So if you got access to professional calibrated equipment, you can make the Heiman Air Quality Monitor very precise. Just keep in mind how the Automatic Baseline Calibration works, and you will have a very good CO2 monitor for a very low cost.
I like calling this a CO2 monitor, because I think it should have other sensors such as VOC or PM2.5 sensors to be a prober Air Quality Monitor.