This is part 3 in my Storage Spaces series. Here I will enable the storage bus cache and setup mirror-accelerated parity with awesome performance numbers. This series have nothing to do with Home Assistant, except providing hosting capabilities for the Home Assistant appliance.
In part 2 I tested parity performance in Storage Spaces on Server 2025, and found out that it was quite decent, even if I used the default settings. But I got 2 Intel Optane 905p NVMe drives, so can I make a supported configuration where these will take performance to a new level, let’s try. If you would like to know why Intel Optane drives are perfect as cache drives in Storage Spaces, see part 2.
If you like me have played around with Storage Spaces, you need to clean up everything before you can continue. Delete volumes, then virtual disks, and then the storage pool. Now you can go to diskpart and run a “list disk”, and you should see all your drives. If you don’t, you need some more cleaning in Storage Spaces, and maybe a reboot. When you see all your drives in diskpart, you need to select them one by one, and run a clean on them. This will reset the disk to factory state, and delete everything on it, so make sure you have saved all the data, and make sure that you select the correct drives in diskpart. Once you have cleaned all the drives, you are ready to proceed.
This setup is by far the best documented by Microsoft, because it’s a newer feature that was introduced with Server 2022. We are basically following this documentation, but I will try to explain everything in my own words.
Before we start, make sure to install the Failover Clustering feature from Server Manager or PowerShell.
From now on, everything is configured from PowerShell. I use ISE, since it makes it easier to edit and save commands for later use.
Import the PowerShell module:Import-Module StorageBusCache
Check your settings, and if needed, change them before enabling storage cache bus, because most settings can’t be changed after it’s enabled. I kept mine at the default settings:Get-StorageBusCache
Check that all your drives are there, and that they all have a number below 500, and have the CanPool status True, except your boot drive:Get-PhysicalDisk
If everything is OK, then it’s time to enable to storage bus cache.
This will enable the storage bus cache, and create bindings, it will take a few minutes: Enable-StorageBusCache
Check that all your drives, except your boot drive, have a number above 500 now, as this will indicate it’s part of the storage bus cache:Get-PhysicalDisk
Check that all your HDDs are listed with a cache device:Get-StorageBusBinding
If you refresh the Server Manager, you can see the Storage Pool in the the GUI, but we will continue in PowerShell.
You can see that the “Enable-StorageBusCache” command created a new storage pool called Storage Bus Cache on Computername:Get-StoragePool
You can see the storage tiers created by default:Get-StorageTier
You can see the settings of a specific storage tier. You can see some of the parameters here are set to auto, so we need to check a more specific storage tier after we create the virtual disk and volume:Get-StorageTier ParityOnHDD | fl
Create a new volume like this. This will create a new volume called TestVolume with 100GB of mirrored SSD and 1000GB of Parity HDD. Remember that mirror-accelerated parity is a ReFS feature, so always choose ReFS filesystem:New-Volume –FriendlyName "TestVolume" -FileSystem ReFS -StoragePoolFriendlyName Storage* -StorageTierFriendlyNames MirrorOnSSD, ParityOnHDD -StorageTierSizes 100GB, 1000GB
Here you can see the specific settings on the parity tier you just created above:Get-StorageTier TestVolume-ParityOnHDD | fl
If you want to add more space to the tier, you can use this command. Remember to extend the volume size in Disk Management afterwards:Resize-StorageTier -FriendlyName "TestVolume-ParityOnHDD" -Size 1500GB
If you like what you have created, assign it a drive letter in Disk Management and start using it.
If you make a benchmark that stays within the NVMe tier, you will see performance like this.
If you want some storage for more intense IO, it could be tempting to create a volume with mirrored SSD and mirrored HDD, but looking at the official documentation, it looks like you can’t when using the storage bus cache.

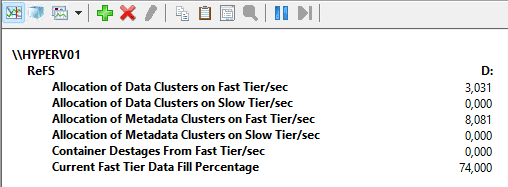
After moving a lot of data to the volume, filling it around 70%, I saw some fairly slow response time and started investigating. All my writes landed on the slow tier, and according to ReFS performance monitor, the current fast tier data fill percentage was 0, indicating that the fast tier was not used at all, and I could see all writes landing on the slow tier.
I tried creating a new small test volume, and tiering worked fine on that, so in best Microsoft style I rebooted the server, and the problem went away, and everything was running smoothly with low response times again.
If you like to keep an eye on the tiering to see how it works, and how your storage performs, you can use the performance monitor, where you add these ReFS counters:
Allocation of Data Clusters in Fast Tier/sec
Allocation of Data Clusters in Slow Tier/sec
Allocation of Metadata Clusters in Fast Tier/sec
Allocation of Metadata Clusters in Slow Tier/sec
These 4 will show there writes are landing. They should be landing on fast tier.
Container Destages From Fast Tier/sec – this will show rotation from fast tier to slow tier.
Current Fast Tier Data Fill Percentage – this will show how many percent of the fast tier is in use.
If your workload requires large waves of writes, like a backup server, you can modify how quickly data is rotated from fast to slow tier.
Per default Storage Spaces ReFS will keep 15% of the fast tier free to allow for writes to land there. You can adjust the value in regedit.Set-ItemProperty -Path HKLM:\SYSTEM\CurrentControlSet\Policies -Name DataDestageSsdFillRatioThreshold -Value 75
This will change it to 25% free space.
If you have large NVMs drives and your workload doesn’t contain large waves of heavy writes, you should keep the default setting, or set it higher at 90%, since it will accelerate things to keep as much as possible on the fast tier.
If you have small NVMe drives, or have a workload that will often fill the “Current Fast Tier Data Fill Percentage” to ~100%, you should set it lower, to keep more free space available on the fast tier for the heavy writes waves, but don’t go too low, as it will decrease your performance when you move all data to the slow tier.
When writes come in at normal speed, like 1 Gb/s, storage spaces can keep up, and rotate data in the background, and never exceed the DataDestageSsdFillRatioThreshold you configured. If that is your case, don’t lower the number.
Changing DataDestageSsdFillRatioThreshold requires a reboot of the server, and you can read more about it here.
Storage Spaces is a funny thing. I really like my setup, and 1 or 2 HDDs more could take storage efficiency up, and make it a very good setup. But I can’t even find the maximum number of columns allowed in a dual parity in the official documentation, and exactly that, makes it very hard to recommend to everyone, because every use case is different, and with this poor documentation, it’s impossible to know if it will work, and if it’s a supported configuration. In the TechNet archive I found a FAQ with a nice table saying 17 columns are the maximum in a dual parity setup, but this is old information and moved to archive for a reason, so it’s a guess whether that’s still the case in 2025. But remember, if you want 75% storage efficiency, you need 10 HDDs and not 8, because you want 8 columns.
Storage Spaces have a great feature, that in case of a HDD error, allows for the data to be reallocated on the other disks, making a fast recovery to full redundancy. This of course requires that you leave enough free space on the storage pool. You won’t find this anywhere in the GUI or in PowerShell, or in the official documentation, so you are on your own trying to remember to reserve the required free space. If you don’t have enough free space when a disk goes bad, you can retire the disk and replace it with a new.
Conclusion:
Storage Spaces in Server 2025 is pretty good from a technical standpoint, but I won’t recommend it to everyone as of now. If you want something simple and easy to maintain, I cannot recommend Storage Spaces. You need to be a Microsoft IT Pro and be OK with searching the web for information, and do a lot of trial and error.
It’s a shame that the Microsoft engineers made a good product, and then administration and documentation lacks so bad. The good thing is that Microsoft can actually fix this, if they want to. Until they do, I would think twice before going down this route. 1 thing is a home server / home lab, where you might have the time to investigate and do trial and error, but if you are a SMB looking for a cheap hypervisor and storage setup, you should only consider this route by choosing a full package solution where specialist support is included, and hardware is certified.
It’s not even documented how you replace a dead drive, and that really tells something about how horrible the documentation is.