I have been running 2 of these AirGradient ONE with model number I-9PSL for the past 6 months, so it’s time to write a review.
I have both the fully assembled and certified model, and the kit model that comes with a large discount. In this review I will compare them to each other, and to my Airthings View Plus. Of course I will show you how they integrate into Home Assistant, and talk a little about AirGradient approach, which differ from a lot of other companies.
If you are just looking for a way to buy the AirGradient ONE, You can buy the fully assembled device here, and you can buy the kit here.
First, let’s compare the 2 AirGradient models. The fully assembled and certified model can be yours for 230 USD, and the kit is 138 USD. That’s a large discount for the exact same hardware, so what is the differences. The assembling takes 10 minutes and is easy for most people with some technical flair, but you don’t get any warranty or certifications and test report, which means you suddenly lack the CE, FCC and RoHS certifications as well. You basically imported the parts yourself and made a fully functional product yourself. I think for many people the discount for the kit will be worth it, but only yourself can answer that question.
Let’s open the boxes. I have placed them side by side here, so you can see the differences.
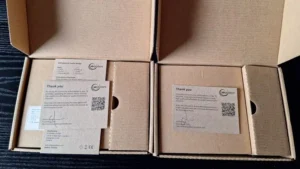
As you can see, on the kit product, there is an extra bag of components that should be mounted.
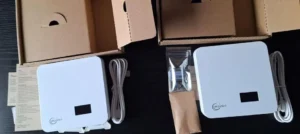
Luckily it is only 3 simple components, so mounting them in the prepared spots is easy.
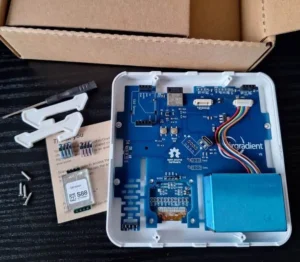
I opened the fully assembled product so you can see and compare them side by side.
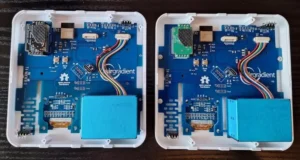
After assembling it is time to power up the devices, one at a time.
The AirGradient ONE uses USB power, and comes with a 2M USB cable, but you have to use a power supply of your own capable of delivering 2A on 5V, so most old smartphone charges will do.
The AirGradient ONE will create a WiFi hotspot you can connect to, and do the initial config. I had problems with this step, because it would not allow me to connect my PC or my phone to the hotspot. Some times it would connect and then disconnect me after few seconds. I tried firmware updating the devices, but that didn’t help. Once I reset the device, I could connect, and it was the same story with the other device. It was 6 months ago, and AirGradient have probably fixed this problem with a firmware update by now, but if you encounter this problem, just reset the device using the pinhole and this procedure.
Flashing the device is very easy, just connect the USB cable to your PC, and you can do it directly from your browser (Edge / Chrome) from AirGradient website.
After connecting to the hotspot, you open 192.168.4.1 in a browser, and you are able to connect it to your WiFi.
Next up, Home Assistant will find the device on your network and you can simply add it.
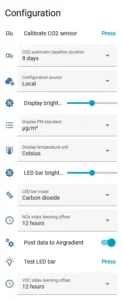
The device exposes a lot of configuration options beside the sensors, showing that this device was meant to be controlled via Home Assistant.
This is very neat for Home Assistant users, since it allows complete control via Home Assistant, and you only need internet connectivity to do automatic firmware updates. Thumps up to AirGradient for this!
The sensors in this device consist of the usual ones at this price point. comparing to Airthings View Plus shows it lacks the radon sensor, but provide more details on PM, and include NOx measurements.
Depending on where you live, different sensors have more or less value. Besides temperature and humidity, the sensor I use most is the carbon dioxide, to provide me with an idea of when I need to open a door or window, to get some fresh air in.
A nice touch with AirGradient ONE is the LED’s on the device, providing easy understating to the rest of the house. It can be hard to teach everyone else in the house at which level of carbon dioxide they should ventilate. It’s a lot easier to tell them to look at the LED’s, showing green, yellow, or red based on the carbon dioxide level.

In order to compare the AirGradient ONE with my Airthings View Plus, I connected the Airthings View Plus to power instead of battery to make it fair. But even with power connected to the Airthings View Plus, the AirGradient ONE is still a lot more volatile, providing faster changes. I am sure this is happening because Airthings decided to use more data samples to get more accurate readings, while AirGradient ONE have decided to go with less data samples or simply taking faster samples since it is always powered.
The example could be Airthings View Plus CO2 sensor, which is a low power device made for battery operated device, so it uses less energy and takes less samples, and therefor providing a slower response than the CO2 sensor in the AirGradient ONE.
You can see the difference in the graph:

But the measurements of all the sensors between the 2 are pretty equal, and without calibrated reference equipment, it’s impossible to tell who is more precise.
Looking at the list of sensors in the AirGradient ONE, it’s no surprise that everything is working as expected, but it is still nice to see in real life, over half a year, that this is a solid device, with precise measurements.
Another thing that means a lot to AirGradient is open source and open hardware. And if that ain’t enough, they also care about your data, and your privacy.
AirGradient ONE are an open design. You can go to their website and get detailed instructions on how to build your own device, and they have prepared the print for extra sensors, making it easy to expand.
The firmware is open source, and you are allowed to edit it and flash your device with your own firmware.
You own the data your device creates. If that sounds like common sense, it is, but if you read the terms & conditions from other air quality sensors, you will see that they see it differently.
AirGradient ONE can operate with the AirGradient cloud, or completely local. My 2 devices operate completely local, and store all data in Home Assistant, where I can also do the configuration from. Internet is only used for automatic firmware updates in my case.
If you are a non-technical human being, who just want an air quality sensor that works, all the above may not mean a lot to you, and may not weigh much in your buying decision. But remember, if you buy a device that are bound to a specific cloud service, and that company goes down, your device will probably stop working within short time.
The AirGradient ONE will continue to work even if AirGradient as a company goes down.
Last thing to comment before the conclusion, is the design. AirGradient ONE is a quite big box, that could have been smaller. since it have ventilation holes in the bottom, it needs feet when placed on a desk. I have wall mounted both of mine, 1 in my living room and 1 in my bedroom, where it is very nice to be able to control the LED and screen brightness from Home Assistant. Comparing the design against the Airthings View Plus, you can see that AirGradient gave up some things, to make the device expendable in the future, and make it easy to disassemble and re-assemble. Airthings View Plus is smaller, even though it have space for 6 AA batteries.
Conclusion:
Overall working with the 2 AirGradient ONE devices have been a great experience. Besides the small hiccup with the WiFi hotspot, I have not had any problems with the devices, and they have always reported correct values. AirGradient ONE contains quality sensors from quality brands, and the ability to replace them, should a sensor fail.
They do require a power supply instead of batteries, which may be a concern for some, but they make up for it with very fast sensor readings.
I love the whole concept with open source, open hardware, and full transparency, and I hope AirGradient will get success with the concept and inspire other companies to take the same approach.
If you are looking for an air quality sensor, and the radon sensor or battery operation is not on the top of your list, I will highly recommend the AirGradient ONE. Whether you should buy the assembled device or the kit, depends on your preference.
You can buy the fully assembled device here, and you can buy the kit here.
The AirGradient ONE devices was send to me free of charge, but this review is still my honest opinion, and is by no means affected by how I acquired the devices.